Great video, the title says it all. The Code : The Story of Linux. Found this in my G+ Stream and thought it was great. Thanks +JayVan Geli

My Linux skills have been limited to a basic install, and getting around in the system. I've recently decided to take the O.S. more seriously and become a full time user and more of a Linux hobbyist. This is a place for me to post notes, and other helpful information. The information here is centered around Fedora and KDE but I do post about other GNU/Linux distributions. You can find useful notes, book reviews, tutorials, videos, and whatever else I think will be useful for learning this O.S.
Tuesday, October 7, 2014
Sunday, August 31, 2014
Chapter 4 LFS101x Introduction to Linux - REVIEW
It's a lazy Sunday afternoon in Western New York where I live. I woke up this morning to cloudy grey sky and the most excellent cool breeze blowing through the open windows. Perfect day to do a chapter of the LFS101x Introduction to Linux course.
I'm now on chapter 4 and so far so good.The first 4 chapters have been really basic, but I would highly recommend this course to any new Microsoft to Linux converts out there. A friend however, told me that the course really picks up after chapter 4. I'm gonna start chapter 5 this week.
Anyway the course is really enjoyable, and I had the perfect day to relax and focus on a chapter of it. A big disappointment for me is that the course is very Gnome oriented. I currently enjoy KDE, and don't really plan on switching anytime soon. I've used Gnome till Gnome 3 and then made the switch to KDE and don't think I'll ever look back.
For me the fact that they use Gnome is not a big deal. I can usually connect the dots and figure out the slight differences between Gnome and KDE. For a new user however this might be problematic, or at the very least, extremely confusing.
I like the way they broke the labs into Fedora, Debian and Suse sytems. It would of been nice if they were a little more diverse with the desktop environment. For instance, maybe Gnome, KDE and XFCE. Or at least use KDE with the openSuse lab seeing its the default desktop for that distribution. One reason I've been thinking about making the move to openSuse. Anyway, that's my only complaint about the course so far. They should of used a couple different desktops besides just Gnome.
So chapter 4 covers the Gnome desktop. Topics include logging in, changing users, putting the computer into sleep mode, and screen locking. Something new I learned today is that you can lock the screen using ctrl-alt-l . Walk away from your computer, lock screen, use root password to log back in. This comes in handy if you have to step away from your computer and you're in a room full of people you may not entirely trust. Unfortunately in my world this happens more than I'd like to admit ;-)
The chapter also gets into a little customization and shows you how to change your desktop background, and change your computer theme.
Chapter 4 also covers basic operations. Launching programs, getting around Nautilus (Dolphin if you use KDE), finding drives, usb, cdroms, etc.
Finally, there was a little about using Gedit to edit a file, deleting files, and recovering files. All fairly basic straight forward stuff.
I'll be starting Chapter 5 next week sometime. I'm not sure if I'm going to review each chapter but I may cover some of the interesting points covered in each chapter I read.
Thanks for reading and if you want to find out about signing up for the course, check out my previous post with the sign up link here.
Friday, August 29, 2014
The First 3 Chapters of LFS101x : Introduction to Linux
Last night I started the LFS101x : Introduction to Linux course and today I got through the 3rd chapter. The course is an edX course online and so far it's pretty interesting.
Chapter 1 gets into a little information about the Linux Foundation. I found that pretty interesting. I often wondered exactly what they did, and chapter 1 explains that.
Chapter 2 is mostly about Linus Torvalds the founder of Linux. The chapter lays out a brief history of Linux, a little information about Linus Torvalds, how Linux got started, how its created, and how its works. The chapter is brief but interesting.
Chapter 3 covers installation, choosing a Linux based O.S. and a little about boot loaders, file system structure, partitioning and the boot process itself.
So far so good. The first 3 chapters were very basic, yet very informative. The 3rd chapter already started getting a little more detailed though. Explaining how the bios works, and the way the init file starts and shuts down the system cleanly. I knew a little about bios, and now I know a little more. I can already tell the course is going to be very helpful in learning a lot of the finer details about using the O.S.
On a final note I thought it was really cool how the course is laid out and explained. They break the course tutorials into three categories showing you how it would work on a Debian system using Ubuntu, a Fedora system using CentOS, and a SUSE system using the openSUSE. I thought that was really cool.
If you want to find out more about the course or sign up yourself you can click here. The course is free to audit, and I'm really happy I signed up. If you're new to Linux or someone who just wants to know a little more than how to point and click in an Xwindows environment I highly recommend this course.
Wednesday, August 27, 2014
Just Started the Linux Course at EDx
I forgot all about this. I wanted to really improve my Linux skills and I found this free course. You can either get certified for a fee or audit the class for free. I'm cheap and of limited financial means so I opted to audit the course.
I forgot all about it, and just remembered the course started at the beginning of this month. It's a learn at your own pace course, and the courses are all laid out for you. Good news seeing I'm a full month behind the course start date.
Anyway, consider this a monthly update. As I learn I'll post some updates here. A friend of mine is taking the course and said it starts out real simple and covers the basics and then gets more and more involved. I'm so excited. I just want to get my Linux skills to surpass my Windows skills.
Here's a screen shot of the course and if your interested in signing up, I think sign ups are still available Click here.
 |
| Screen shot of the edX Introduction to Linux course !!! Triple exclamation marks because I'm super excited !!! |
Wednesday, August 13, 2014
Basic Computer and OS Information Using uname
Need a little information on the computer OS your using? uname is the perfect command for that. Lets say your installing some software on a friends computer that you know nothing about, or maybe your not sure if you need the 64 or 32 bit version of a program. The uname command can save the day.
By typing man uname you can read all about the options that can be used with this command. For the sake of simplicity and keeping this blog post short we're going to use the -a option. This is the all option and will give you just about all the information you would get from using the separate options. For instance, uname -p tells you your using a x86_64 bit processor. Now you know you can install that 64bit version of that software you wanted to install.
Here's the output I get from uname -a
Linux localhost.localdomain 3.14.8-200.fc20.x86_64 #1 SMP Mon Jun 16 21:57:53 UTC 2014 x86_64 x86_64 x86_64 GNU/Linux
This tells me that I'm running Linux, the name of the network node is localhost.localdomain very helpful when doing networking, I'm using 3.14.8.fc20.x86_64 which translates to kernel version 3.14.8 Fedoracore 20 x86_64 basically Fedora 20 64bit. I have no clue what #1 is ? Maybe one of the readers could leave a comment if you know? SMP is Symmetric multi-processing I'm pretty sure this means I'm running multiple processors, the date the kernel was compiled Mon Jun 16 21:57:53 UTC 2014, the system architecture x86_64, meaning its a 64 bit system in this case, and again x86_64 GNU/Linux operating system.
Thats a lot of information in a quick keystroke. The command comes in handy when working on unfamiliar systems, or when logged onto a computer remotely. To find out more about uname try either man uname or uname --help.
By typing man uname you can read all about the options that can be used with this command. For the sake of simplicity and keeping this blog post short we're going to use the -a option. This is the all option and will give you just about all the information you would get from using the separate options. For instance, uname -p tells you your using a x86_64 bit processor. Now you know you can install that 64bit version of that software you wanted to install.
 |
| I Gimped the computer name for reasons of paranoia. This is the basic output from the uname -a command. |
Linux localhost.localdomain 3.14.8-200.fc20.x86_64 #1 SMP Mon Jun 16 21:57:53 UTC 2014 x86_64 x86_64 x86_64 GNU/Linux
This tells me that I'm running Linux, the name of the network node is localhost.localdomain very helpful when doing networking, I'm using 3.14.8.fc20.x86_64 which translates to kernel version 3.14.8 Fedoracore 20 x86_64 basically Fedora 20 64bit. I have no clue what #1 is ? Maybe one of the readers could leave a comment if you know? SMP is Symmetric multi-processing I'm pretty sure this means I'm running multiple processors, the date the kernel was compiled Mon Jun 16 21:57:53 UTC 2014, the system architecture x86_64, meaning its a 64 bit system in this case, and again x86_64 GNU/Linux operating system.
Thats a lot of information in a quick keystroke. The command comes in handy when working on unfamiliar systems, or when logged onto a computer remotely. To find out more about uname try either man uname or uname --help.
Monday, August 11, 2014
Video : Nixie Pixel Explains the Linux File System.
Just playing around on Youtube and came across this video. Nixie Pixel gives a quick tour and explanation of the Linux file system. Very informative, and explains a lot in under 6 minutes.
Saturday, August 9, 2014
Get Out Of Firefox Full Screen n00b moment.
Just had a serious n00b moment. Surfing the net in the dark, hit the wrong key and Firefox went into full screen mode. Hit a bunch more keys to try and get out of full screen mode and nothing worked. Continued on like this for about 5 minutes, then decided to do a search.
Did a quick google search and discovered that hitting F11 will get you out of full screen mode in Firefox. NOW DON'T I FEEL STUPID. However, I was happy to discover that I wasn't the only one. https://support.mozilla.org/en-US/questions/959183
Did a quick google search and discovered that hitting F11 will get you out of full screen mode in Firefox. NOW DON'T I FEEL STUPID. However, I was happy to discover that I wasn't the only one. https://support.mozilla.org/en-US/questions/959183
 |
| Doing this will get you out of full screen mode. Took me about 5 minutes of hiting keys, and a google search to discover what I was doing wrong. n00b moment ! |
Wednesday, August 6, 2014
August
 |
| August Image Edited in Gimp |
Wednesday, July 16, 2014
wget A Super Duper Image Scooper !

Occasionally you come across a page of content and you just don't feel like clicking on each image or video individually. The other day I came across a site of hot rods with over a thousand images. That's a lot of clicks ! Who has time for that. Here's what you do.
wget to the rescue !
You may have used wget to download stuff from the internet. A simple file grab with wget would look like this :
wget http://www.websiteName.com/filename.mp3
If you've never used wget before to download a file, search the internet for a file to download, open up a terminal, type wget and paste the download link after it like in the example above.
I don't know why but for some reason when I download something from the command line using wget it seems to download so much faster than downloading it in Firefox or using a browser. So I often cut and paste download links from the internet and download with wget from the command line. Ahright, I digress ! Assuming you understand the very basics of wget, here's how we would use it to grab images from a webpage.
Note: Use man wget to learn more about this command. This is the very basics and just something I've been experimenting with.
The Command
wget -r --level=2 -v -A jpeg,jpg --wait=2 http://www.targetDomain.com/webpage.htm
The above is all one line of code. So what do we have here and why does it work?
wget (command line utility used to download files)
-r (this is recursive, and will continue scanning directories to find the images or videos)
--level=2 (this will only allow it to scan 2 levels of directories, the higher the number the more directories it will download.)
(if you wanted to download an entire website of files you could omit the --level=2 NOT RECOMMENDED, but you could if you want)
-v (this is verbose, and will show you whats happening as it downloads, again this is optional)
-A jpeg,jpg (this creates the accept list in this example jpeg, jpg,. You could just as easily change jpg to gif, flv, mp3, mp4 etc, etc, or change it up a bit and download jpg, and mp4. That would download images and video. You can add as many file types as you want here separated by comma.You get the point ! )
--wait=2 (this is really important, this gives you a 2 second wait before each downloaded file. This command will download files so fast, that you really want to add this to help decrease server load. If you were to download an entire site, leaving out --level you should probably increase this number to around 5 to 10 seconds. You don't want to DDoS the server.
Finally ...
http://www.targetDomain.com/webpage.htm (the web page or website you want to download. Again I would refrain from downloading entire websites, as this can really strain the server your downloading from.)
So there you have it. This is the very basics, and you could really get more detailed in creating a Super Duper Image and Video Scooper command. As always to learn all the command options type man wget to learn more about this powerful tool/command ! Once you create a really great command , create a script for it and then you could just run the script and add the web address for instant downloading fun.
Enjoy !
Here's a link to the ftp: man page on wget.

Wednesday, July 9, 2014
15 Month Update Linux Full Time
It's been about 15 - 16 months since I switched over to Fedora from Windows 7. I have to say, the longer I use Fedora full time the happier I am with my decision to drop Windows all together. The more I dive into using Linux the more useful stuff I discover. Much of this I will start sharing on the blog.
After using Microsoft operating systems for a little over 20 years, I had a real comfort factor using the product. If anything broke, I knew what the problem was and how to fix it immediately. It was an almost Zen like computing experience, and things rarely went wrong. If it wasn't for the fact that I really hated Windows 8, and the over priced software updates that came with it, I may never have switched.
This confident user experience is a feeling I miss using Fedora. It's not for any bad quality in the Fedora product itself, but a simple lack of understanding on my part. When something goes wrong, I have to really research and read, and learn in order to fix the problem. Just like I had to 20 years ago when I started using Windows 3.11.
Just this week I realized that familiar safe feeling is coming back with Fedora now. I may not know how to fix everything but if something is off I can usually figure out whats wrong, and what needs to be done to fix it.
I occasionally make a n00b mistake, like the other day when I deleted yum instead of a different program using RPM. Ya, I was using RPM to remove part of a package without removing all the dependencies and thinking yum for some reason and with a quick $ rpm -e --nodeps yum return, yum was gone. Dope !!! Yet, even after doing something so ridiculously idiotic, it only took about 15 minutes to fix ! Something that probably would of taken all day 15 months ago :) I have to say, it was a bit of confidence builder.
The mystery repair is always nice as well. Although it sucks not really understanding how you fixed something, and what you did to actually fix the problem. The fact that you got it to work, and knew what you had to do to make it work, is always gratifying. When this happens it's just a matter of time before you understand the "why" and "how" of it all !
I look back on learning Windows 20 years ago and remember how amazed I was with the computer. I read everything I could get my hands on, and learned the system inside and out. I could tell you what files did what, and why Windows used that file. I want to get this feeling with Fedora and Linux in general. Then I thought about it and realized 15 months into this and I've got a pretty good handle on this thing. Everyday I learn a little more now, and the more I learn the easier it is to understand. In a couple more years I'm sure I'll have that zen like feeling using Fedora or any brand of GNU Linux I choose. In the mean time I have a ton of great open source software to use, and a million ways to tweak my system for maximum work-flow.
On a final note, that is one of the things I'm getting really comfortable with now. I love the way a system can be tweaked a dozen different ways depending on what you're doing. Things like multiple desktops, and setting up the alt tab Windows switching are all huge time savers. The more I learn about KDE and the Linux command line, the more I incorporate the functions into my daily work-flow, and the more time I save. This in itself is worth the price of admission and will probably be the reason I never switch to a different operating system again. Only time will tell.
Monday, June 30, 2014
The Linux Mystery Repair
 |
| The computer mystery man. |
So, why don't I like running updates when my system is running great ? For the exact reason I'm about to tell you. I run my security update, and there's a new kernel version waiting for me and about 30 or 40 other updates all security related. The files download, install, alls good, I reboot and I can immediately tell something is wrong with my screen resolution and graphics. On top of that all the cute little desktop effects that KDE offers aren't working anymore. WTF !
I do a search to see if anyone has reported this problem after updates, and discover that many people have . Next I read through a ton of posts, some make sense others not so much. After looking at /var/log/Xorg.0.log
I discover that the update probably switched my system to a generic graphics driver. I then found this thread on the Fedora Forums that had my exact problem with the same chipset and on board graphics card I'm using.
00:02.0 VGA compatible controller: Intel Corporation Mobile 4 Series Chipset Integrated Graphics Controller (rev 07)
00:02.1 Display controller: Intel Corporation Mobile 4 Series Chipset Integrated Graphics Controller (rev 07)
I follow the thread and agree that the mesa-dri-drivers need to be updated. Now here's where things get interesting ! All the while I'm taking notes, thinking about doing the blog post on this and trying fix the problem. I update a couple different sets of drivers and nothings working. I do some reboots and still nothing. Same problem. The last thing I do is install mesa-vdpau-drivers.x86_64 and still nothing.
I realize 4 hours have passed, and my favorite Sunday night T.V show is coming on so I shut down the computer and watch some t.v. After my t.v. show I decided to go for a jog, (I'm getting fat !) come home, hop in the shower to rinse off the sweat, and give it one last try . I boot up my system and holy crap on a cracker my desktop effects are working again and the graphics card appears to be rendering everything properly !
Now I thought I rebooted after the last driver update, maybe not. Also from what I read I thought I didn't have to reboot. Anyway this is the mystery repair. I love and hate when this happens ! I'm glad the problems fixed but I'm still somewhat confused as to how the problem got fixed. Almost makes you wonder if I fixed it or some mystery computer guru snook into the room while I was out jogging and repaired my system. Stranger things have happened.
Anyway if you're having a hard time with KDE desktop effects not working after your last update, check out the above thread and see if it works for you. From what I researched it's currently a known bug and effects mainly that chipset. Good luck and sorry I couldn't be more helpful. It's a mystery !
Friday, June 13, 2014
Old Keyboard PS2 to USB
This is the old keyboard I found in the garage. It was a PS2 and I wanted to use it as a USB keyboard to plug into my laptop at home. I've been using it for about two weeks and all is going well. I thought about just ordering another keyboard until I seen how much they go for these days. So I'm really glad I got the adapter.
The keyboard in the picture is probably close to 20 years old. It's a Microsoft keyboard , running on my Fedora machine. The windows keys are now used for foreign language accents like í ñ ö and making symbols.
I got to know a guy at one of the local mega mart computer stores. They had a close-out bin in the back of the store of returned and damaged merchandise. The guy at the store would call when there was anything good in there. Hard drives, keyboards, ports, cables, you never really knew what you would find in there. At one time I had enough extra parts to build a computer from extra parts. I originally purchased this keyboard for $5.00 similiar keyboards on Amazon are like $50.00 + dollars now. Here's one on Amazon for $255.00 Microsoft Natural Keyboard It's pretty close to what I'm using. Twenty years later its still going strong.
I hate people using my computer so the keyboard was painted making it unusable to anyone that didn't know how to type. I hate telling people no, so when people asked, "Can I check my email real quick?" I'd say sure, and 9 out of 10 times they would take one look at the keyboard and say "Never mind, I'll do it when I get home." No more downloaded email virii from friends email attachements !
Anyway, I was bored, felt like doing a quick post, and that's the history of the microsoft ps2 keyboard now being used as USB on my Linux machine.
The keyboard in the picture is probably close to 20 years old. It's a Microsoft keyboard , running on my Fedora machine. The windows keys are now used for foreign language accents like í ñ ö and making symbols.
 |
| Microsoft ps2 keyboard now being plugged into my usb port on my linux laptop. |
I got to know a guy at one of the local mega mart computer stores. They had a close-out bin in the back of the store of returned and damaged merchandise. The guy at the store would call when there was anything good in there. Hard drives, keyboards, ports, cables, you never really knew what you would find in there. At one time I had enough extra parts to build a computer from extra parts. I originally purchased this keyboard for $5.00 similiar keyboards on Amazon are like $50.00 + dollars now. Here's one on Amazon for $255.00 Microsoft Natural Keyboard
I hate people using my computer so the keyboard was painted making it unusable to anyone that didn't know how to type. I hate telling people no, so when people asked, "Can I check my email real quick?" I'd say sure, and 9 out of 10 times they would take one look at the keyboard and say "Never mind, I'll do it when I get home." No more downloaded email virii from friends email attachements !
Anyway, I was bored, felt like doing a quick post, and that's the history of the microsoft ps2 keyboard now being used as USB on my Linux machine.
Wednesday, June 4, 2014
Use the Compose Key To Type Accents In KDE 4.12
I'm trying to become a bi-lingual citizen and broaden my horizons in the fine art of linguistics. I've had a love affair with the Spanish language for some time now, and recently decided to start a learning Spanish blog to help me stay focused with my studies. One of the first things I realized I needed to do was set up my keyboard so that I could use the funky accents found in so many Spanish words. Por ejemplo: the blogs name is Mi Palabra Del Día. I needed to be able to put the accent mark over the "i" in Día.
What is a GNU / Linux user to do using KDE 4.12 ? You need to enable the compose key so that it can be mapped to any modifier key. The great news is you can also use this for math symbols like ½ or the copyright symbol ©new-aeon-design.com, or confusing friends with an upside down ¿. If you look around you can find all kinds of lists of symbols that you can create enabling the compose key. Here's how it works.
First things first lets enable that compose key. This tutorial is for KDE 4.12 if you're using Gnome you can check out the tutorial that helped me figure this out here. GNOME tutorial. If you're using KDE 3.x try this.
O.k, using the application launcher of your choice go to System Settings -> Hardware -> Input Devices.
Now you want to click on the Layouts tab.In the third column that says Shortcuts for Switching Layout , click on the Main Shortcuts button.
Next click on Position Of Compose Key and select the keys you want to use as the compose key. I used the Windows key because I rarely use it and I have one on the left side of my keyboard and the right side, so I thought it would be easier to use once I was comfortable with it. Select your keys and then press the apply button in the bottom left hand corner.
That's it ! You're done. Now when you need to accent a letter like ñ you just hit the compose key and the corresponding keys that create the ñ symbol. In this case you would hit compose ~ n . For the í in día you would hit compose ' i.
Here is a list of all the symbols for Spanish o para español.
¿ compose key ? (for this one you have to hit the ? mark key twice while holding shift.
¡ compose key ! (done the same as above, ex: compose key shift!! gives you ¡
á compose key ' a (compose key apostrophe a)
é compose key ' e (same as above just hit e instead of a)
í compose key ' i
ó compose key ' o
ú compose key ' u
ü compose u (compose " u)
ñ compose key ~ n
For a full list of characters to use with your compose key click here.
Articles referenced :
http://ma.ttwagner.com/typing-accented-characters-on-fedora-20/
http://fsymbols.com/keyboard/linux/compose/
What is a GNU / Linux user to do using KDE 4.12 ? You need to enable the compose key so that it can be mapped to any modifier key. The great news is you can also use this for math symbols like ½ or the copyright symbol ©new-aeon-design.com, or confusing friends with an upside down ¿. If you look around you can find all kinds of lists of symbols that you can create enabling the compose key. Here's how it works.
First things first lets enable that compose key. This tutorial is for KDE 4.12 if you're using Gnome you can check out the tutorial that helped me figure this out here. GNOME tutorial. If you're using KDE 3.x try this.
O.k, using the application launcher of your choice go to System Settings -> Hardware -> Input Devices.
 |
| Click image to enlage. System Settings -> Hardware -> Input Devices. This is the icon highlighted in blue and circled in bright green. |
 |
| Click on the layouts tab circled in green towards the upper left. Then in the third column where it says Shortcuts for Switching Layout click the Main Shortcust button highlighted in green. |
Next click on Position Of Compose Key and select the keys you want to use as the compose key. I used the Windows key because I rarely use it and I have one on the left side of my keyboard and the right side, so I thought it would be easier to use once I was comfortable with it. Select your keys and then press the apply button in the bottom left hand corner.
 |
| Click on Postition of Compose key, select the key or keys you want to use as a compose key, click the apply button in the bottom left hand corner and you are done ! |
That's it ! You're done. Now when you need to accent a letter like ñ you just hit the compose key and the corresponding keys that create the ñ symbol. In this case you would hit compose ~ n . For the í in día you would hit compose ' i.
Here is a list of all the symbols for Spanish o para español.
¿ compose key ? (for this one you have to hit the ? mark key twice while holding shift.
¡ compose key ! (done the same as above, ex: compose key shift!! gives you ¡
á compose key ' a (compose key apostrophe a)
é compose key ' e (same as above just hit e instead of a)
í compose key ' i
ó compose key ' o
ú compose key ' u
ü compose u (compose " u)
ñ compose key ~ n
For a full list of characters to use with your compose key click here.
Articles referenced :
http://ma.ttwagner.com/typing-accented-characters-on-fedora-20/
http://fsymbols.com/keyboard/linux/compose/
Wednesday, May 28, 2014
Linux Friendly Product Review PS2 to USB Keyboard
I had an old keyboard sitting in my garage and thought it would be nice to use it on my laptop when I'm at home. So I went on Amazon and looked for a PS2 to USB converter for a keyboard. I should mention that I'm an Amazon affiliate but I only review products that I've used on this blog. Also if the product sucks, I'll tell you it sucked. This product however, did not suck and did exactly what it was supposed to do.
So the other day I found my old desktop computer keyboard in the garage. I remembered how much I liked the keyboard, unfortunately it was PS2 and I didn't think it would work in my laptop. Then I thought maybe I could find a PS2 to USB converter and plug it into my USB port on the laptop.
So off I went to radio shack and thought I would just get a PS2 to USB converter and all would be well. Luckily radio shack didn't have one. The girl at the counter didn't even know what PS2 to USB was. The Old Hack Shack, Radio Shack just keeps getting crappier. Next choice was to go on Amazon and order one. I looked at a couple different converters and discovered by reading the reviews that you can't just use a standard PS2 to USB that you would use for a mouse. This was news to me and I was really glad I figured this out before I placed my order.
Apparently, you should get a special PS2 to USB for a keyboard. For a keyboard the USB adapter needs to convert the signal from the keyboard, otherwise it will not work. This then brought up the dreaded question of "will it work with GNU /Linux ?"
My understanding of this is that if the device you're purchasing meets the "standard device specification" or the "standard device protocols" of the device it should work in your Linux box. This isn't always the case, Linux can be a fickle friend, but for the most part, if you follow this rule the device should work.This goes for sound cards, video capture devices, and anything USB related.
Problems usually arise when companies deviate from the industry standard specification and then fix the problem using proprietary drivers. This can make it difficult to use the product for a Linux box, unless of course you write code and can create your own device drivers. I, myself, can not perform such a task.
So I did a little research online, and I couldn't really find out a lot about the PS2 to USB keyboard converter. I had a good feeling though and it only costed a whopping $9.00 so I took a chance. The item arrived in a couple days, I plugged my PS2 keyboard into the USB converter, plugged the converter into my computers USB port and all worked great. I now have a standard desktop ergonomically correct keyboard to use when I'm working at home on my laptop.
This was literally plug and play. This is something that is happening more and more with Linux devices and I can't say how happy it makes me. You have to love unwrapping a product, installing it in your computer, and it works right out of the box.
So if you have a old PS2 style keyboard lying around and you want to plug it into a USB port this converter worked great on my Linux rig running Fedora20.
As always thanks for reading. I have more information on fonts and font management to post in the next few days. Feel free to comment and have a great day !
The Story ...
So the other day I found my old desktop computer keyboard in the garage. I remembered how much I liked the keyboard, unfortunately it was PS2 and I didn't think it would work in my laptop. Then I thought maybe I could find a PS2 to USB converter and plug it into my USB port on the laptop.
So off I went to radio shack and thought I would just get a PS2 to USB converter and all would be well. Luckily radio shack didn't have one. The girl at the counter didn't even know what PS2 to USB was. The Old Hack Shack, Radio Shack just keeps getting crappier. Next choice was to go on Amazon and order one. I looked at a couple different converters and discovered by reading the reviews that you can't just use a standard PS2 to USB that you would use for a mouse. This was news to me and I was really glad I figured this out before I placed my order.
Apparently, you should get a special PS2 to USB for a keyboard. For a keyboard the USB adapter needs to convert the signal from the keyboard, otherwise it will not work. This then brought up the dreaded question of "will it work with GNU /Linux ?"
My understanding of this is that if the device you're purchasing meets the "standard device specification" or the "standard device protocols" of the device it should work in your Linux box. This isn't always the case, Linux can be a fickle friend, but for the most part, if you follow this rule the device should work.This goes for sound cards, video capture devices, and anything USB related.
Problems usually arise when companies deviate from the industry standard specification and then fix the problem using proprietary drivers. This can make it difficult to use the product for a Linux box, unless of course you write code and can create your own device drivers. I, myself, can not perform such a task.
So I did a little research online, and I couldn't really find out a lot about the PS2 to USB keyboard converter. I had a good feeling though and it only costed a whopping $9.00 so I took a chance. The item arrived in a couple days, I plugged my PS2 keyboard into the USB converter, plugged the converter into my computers USB port and all worked great. I now have a standard desktop ergonomically correct keyboard to use when I'm working at home on my laptop.
This was literally plug and play. This is something that is happening more and more with Linux devices and I can't say how happy it makes me. You have to love unwrapping a product, installing it in your computer, and it works right out of the box.
So if you have a old PS2 style keyboard lying around and you want to plug it into a USB port this converter worked great on my Linux rig running Fedora20.
As always thanks for reading. I have more information on fonts and font management to post in the next few days. Feel free to comment and have a great day !
Wednesday, May 21, 2014
What the font !
The last couple days, I've been working with fonts. So you can bet the next couple posts to the blog will be about , you guessed it , FONTS ! Not the most exciting topic but if you do a lot of design work , fonts may be of interest to you. If you don't do a lot of design work or change around fonts at all, then these next few posts will probably be pretty boring. In advance, sorry !
Doing some artwork for a customer the other day I thought it was a good time to upgrade and expand my font library. I just couldn't find the right font for the job. So I stopped everything, and started looking around for a font library I could purchase. Because this was a commercial job I wanted a font pack that was commercial use, and if possible royalty free so I could use it on multiple jobs.
I did a little research on font management using GNU/Linux, downloaded a new font manager, more on that in another post, and started searching for a new font pack. I went to Amazon and found this package 5000 fonts . It was just what I wanted and only $29.99. Perfect.
The package was available for digital download, and I was a little concerned about the format the package would be delivered in. Amazon didn't give any information about the file itself, ie; zip, rar, etc... So I figured I'd take a chance, worst case scenario, I download the package, if it's an executable .exe I'll open it on a friends computer, extract the fonts I want and then leave the file in my ftp server for safe keeping and further use down the road.
Amazon unfortunately decided to use a Windows or Mac only downloader. WTF, I just want to download the file, by all that's holy and unholy why would you do such a thing ? Wwwhhhyy ? I couldn't even download the file. So I then called Amazon, told them of my plight, and the customer service rep instantly refunded my money.
The strangest thing about this story is that according to the Amazon customer service rep I spoke with, the customer service department uses Ubuntu. The customer service rep said they can't even use half of Amazons services , and didn't understand why the company wouldn't make the website more Linux friendly.
Now, I can't watch movies on Amazon, and I can't participate in digital downloads. That really sux because I spend a lot of money on their site. Hopefully they make the sight more Linux friendly in the future.
With that said, I'm on a mission today for commercial use font packs that are Linux friendly. I'll be posting my results, along with a little information on the new font manager I downloaded. I guess the moral of this story is , if your looking to use the Amazon digital download service for software, and what not, you're not going to be doing it with a Linux machine !
On a final note, if anyone has any suggestions on where to download some decent commercial use fonts, please feel free to comment.
Doing some artwork for a customer the other day I thought it was a good time to upgrade and expand my font library. I just couldn't find the right font for the job. So I stopped everything, and started looking around for a font library I could purchase. Because this was a commercial job I wanted a font pack that was commercial use, and if possible royalty free so I could use it on multiple jobs.
I did a little research on font management using GNU/Linux, downloaded a new font manager, more on that in another post, and started searching for a new font pack. I went to Amazon and found this package 5000 fonts
The package was available for digital download, and I was a little concerned about the format the package would be delivered in. Amazon didn't give any information about the file itself, ie; zip, rar, etc... So I figured I'd take a chance, worst case scenario, I download the package, if it's an executable .exe I'll open it on a friends computer, extract the fonts I want and then leave the file in my ftp server for safe keeping and further use down the road.
Amazon unfortunately decided to use a Windows or Mac only downloader. WTF, I just want to download the file, by all that's holy and unholy why would you do such a thing ? Wwwhhhyy ? I couldn't even download the file. So I then called Amazon, told them of my plight, and the customer service rep instantly refunded my money.
The strangest thing about this story is that according to the Amazon customer service rep I spoke with, the customer service department uses Ubuntu. The customer service rep said they can't even use half of Amazons services , and didn't understand why the company wouldn't make the website more Linux friendly.
Now, I can't watch movies on Amazon, and I can't participate in digital downloads. That really sux because I spend a lot of money on their site. Hopefully they make the sight more Linux friendly in the future.
With that said, I'm on a mission today for commercial use font packs that are Linux friendly. I'll be posting my results, along with a little information on the new font manager I downloaded. I guess the moral of this story is , if your looking to use the Amazon digital download service for software, and what not, you're not going to be doing it with a Linux machine !
On a final note, if anyone has any suggestions on where to download some decent commercial use fonts, please feel free to comment.
Wednesday, May 7, 2014
The Bastard Child Of My Blogs May Update
Welcome May,
For the May update, all I can say is I want and need to start posting here more. This has become the bastard child of my blogs. I figured when I started using Fedora 20 full time I would have all kinds of original content to post all the time. I figured things would break, things would need to be fixed and coming up with ideas would be easy. This is not what's happened.
It's been roughly about 13 months since I started using Linux full time. In that time I've really had no serious problems to report. Everything has been running fairly smoothly for the most part. With that said, the lack of problems is part of the reason for the lack of content. As I find interesting things Linux related I post them here. No problems, nothing to report, nothing happening except me using an alternative operating system. MAJOR BORING NEWS THERE !
So, I love this blog, and have no intention of quitting it. I think I'm going to start adding youtube vids. Some from other people and some of my own. I also think I'll be doing some software reviews, and information on some of the different programs I've found useful. Finally, because most of the programs I use are running on a GNU Linux machine, I'll be adding some tutorial links from some of my other blogs on Photography and Graphic Design using Linux related software and apps.
If anyone needs any cool cloud brushes for Gimp. Check out the link in this post from my Photography blog for some great cloud brushes.
Thanks for reading. Updates coming soon this month I promise.Thanks for following, and to my Google plus peeps thanks for the love and support on G+. Anyone on Facebook I just added a Notes On Using Linux page there as well. Not much there currently but I just created it today.
Saturday, April 26, 2014
I Wonder If It's Really Him ? God is that you ?
God ? Is that you talking ?
@NewAeonDesign It's called GNU/Linux, actually.
— Richard M. Stallman (@BigDickStallman) April 26, 2014
My reply :
@BigDickStallman sorry :(
— New Aeon Design (@NewAeonDesign) April 26, 2014
Not being sure if I was actually in the presence of a deity I was at a loss for words and feeling a bit ashamed.
Wednesday, March 19, 2014
First 24 Hours With Fedora 20
 |
| Happy Happy Happy ! Fedora 20 rocks ! |
For the most part I didn't notice any major changes, some new log viewers that I didn't notice before. Something I'll have to play with down the road. Fedora 20 also seems to use a little more of my system resources. Nothing major, and nothing to bothersome. I'm going to have to go through the log files soon and look for errors. I had one freeze up, but it's a problem I had with Fedora 18 as well that I was able to replicate in Fedora 20. It just hasn't been a big enough nuisance to have to fix. I'll save that fix for a boring rainy day when I need something to post.
Anyway, enough with this techno babble ! For the tweeted version : Fedora 20 good, fedup rocks, and I'm as happy as a fat kid with cake !
Tuesday, March 18, 2014
fedup Fedora 18 to Fedora 20
So, I really didn't get fed up with Fedora 18, but I used fedup to upgrade to Fedora 20 and was pretty happy with the results. I was considering trying another distro, but was really happy with Fedora 18, then today I came across some software that I wanted to try but it was only available for Fedora 2O. I looked into updating my system and fedup was the suggested solution to upgrade. I had access to a really fast internet connection today, so I decided if I was going to try this , today would have to be the day. This saved me a ton of time on the downloading packages part of this post. All in all the entire process took about two hours. Here's what I did and what happened.
NOTE: You must use su or sudo for all commands ! If you don't have a really fast internet connection add some time to your install for package downloads. This could take some time.
So I decided to try the fedup upgrade from Fedora 18 to Fedora 20 . The first thing I did was read the wiki on fedup here.
As per the instructions I did a full system update to insure everything was compatible with fedup.
yum update
I'm glad I did this because I did make a few changes to Grub that I forgot about and that may have affected the upgrade. The update reset grub back to it original configuration.
Once Fedora 18 was fully updated I installed fedup
yum install fedup
You want to make sure you download fedup-0.8.0-3 as per my research earlier versions can be buggy. Once fedup was installed I rebooted the computer to make sure all the changes and updates took effect.
Once the computer rebooted I typed
fedup --network 20 --nogpgcheck
Unfortunately I didn't notate my notes as to why, but the --nogpgcheck is necessary when updating from 18 to 20 but not when updating from 19 to 20 .
At this point if you don't have Chrome browser installed everything should go easy peazy. Skip the Chrome steps. If you do have Chrome installed continued reading.
Downloading failed: failure: repodata/filelists.xml.gz from google-chrome: [Errno 256] No more mirrors to try.
Google-chrome and google-repositories really goofed me up good for about 15 minutes. If you run google-chrome uninstall it.
yum remove google-chrome
yum clean all
yum clean metadata
Then disable the google repositories
yum-config-manager --disable google-chrome
Once I did this I ran the
fedup --network 20 --nogpgcheck
And everything went fairly smoothly from there. fedup took care of just about everything. At the end of it, where it asks to reboot, I ended up with a couple warnings but at that point I think its almost to late to make any changes. I did some research before I did the reboot and it looked like the warnings were bugs, and o.k. to ignore. This was kind of scary, but all went well. If you get any warnings USE A SEARCH ENGINE AND MAKE SURE ITS BUG AND NOT AN ACTUAL PROBLEM. I think it should go without saying as well that you may want to backup any important data before you upgrade.
Once I rebooted , the entire install took a little over an hour on my computer. No problems at all, all data, and most of my configurations remained unchanged. For a little clean up I simply did :
rpm --rebuilddb
I want to research doing additional clean up, because I know there are a lot of unused files left behind. After I do some research, that may be a post for another day.
And that's it, your done ! Hope this goes as smoothly for you as it did for me and enjoy your update Fedora 20 install. Good luck !
NOTE: You must use su or sudo for all commands ! If you don't have a really fast internet connection add some time to your install for package downloads. This could take some time.
So I decided to try the fedup upgrade from Fedora 18 to Fedora 20 . The first thing I did was read the wiki on fedup here.
As per the instructions I did a full system update to insure everything was compatible with fedup.
yum update
I'm glad I did this because I did make a few changes to Grub that I forgot about and that may have affected the upgrade. The update reset grub back to it original configuration.
Once Fedora 18 was fully updated I installed fedup
yum install fedup
You want to make sure you download fedup-0.8.0-3 as per my research earlier versions can be buggy. Once fedup was installed I rebooted the computer to make sure all the changes and updates took effect.
Once the computer rebooted I typed
fedup --network 20 --nogpgcheck
Unfortunately I didn't notate my notes as to why, but the --nogpgcheck is necessary when updating from 18 to 20 but not when updating from 19 to 20 .
At this point if you don't have Chrome browser installed everything should go easy peazy. Skip the Chrome steps. If you do have Chrome installed continued reading.
Chrome
So here's where I ran into my first problem.Downloading failed: failure: repodata/filelists.xml.gz from google-chrome: [Errno 256] No more mirrors to try.
Google-chrome and google-repositories really goofed me up good for about 15 minutes. If you run google-chrome uninstall it.
yum remove google-chrome
yum clean all
yum clean metadata
Then disable the google repositories
yum-config-manager --disable google-chrome
Once I did this I ran the
fedup --network 20 --nogpgcheck
And everything went fairly smoothly from there. fedup took care of just about everything. At the end of it, where it asks to reboot, I ended up with a couple warnings but at that point I think its almost to late to make any changes. I did some research before I did the reboot and it looked like the warnings were bugs, and o.k. to ignore. This was kind of scary, but all went well. If you get any warnings USE A SEARCH ENGINE AND MAKE SURE ITS BUG AND NOT AN ACTUAL PROBLEM. I think it should go without saying as well that you may want to backup any important data before you upgrade.
Once I rebooted , the entire install took a little over an hour on my computer. No problems at all, all data, and most of my configurations remained unchanged. For a little clean up I simply did :
rpm --rebuilddb
I want to research doing additional clean up, because I know there are a lot of unused files left behind. After I do some research, that may be a post for another day.
And that's it, your done ! Hope this goes as smoothly for you as it did for me and enjoy your update Fedora 20 install. Good luck !
Friday, March 14, 2014
Appending Sequential Numbers To A Word Or File Using Linux
I needed to append some sequential numbering to a word to use in a list. For example :
word01
word02
word03
word04
The sequence of numbers had to go from 1 - 4999. Now I could of wrote this out 4999 times but that would of been painfully boring and probably would of given me a terrible case of carpal tunnel by the end of it all. Plus I use Linux, there must be an easier way to do this and there is ! It's called seq
If you open up the terminal of your choice and type man seq it pulls up a small man page with a few options you can use. The option were interested in is the -f option. This is the printf style floating-point FORMAT. If your interested in getting a better understanding of this click here. Here's a basic command using this format with output:
seq -f "%04g" 6
output:
0001
0002
0003
0004
0005
0006
The "%04g" gives us 4 digits starting with 0001 and continues on to 0006. This is pretty basic. We need to append these numbers to a word now, and start with 01 and go up to 4999. Heres what we do :
seq -f "yourword%02g" 4999
output:
yourword01
yourword02
yourword03
And this goes on till it reaches yourword4999. That would of been a lot of typing.
So now we need to put all this into a text file for another program to reference. Here's what you do.
seq -f "yourword%02g" 4999 > reference_file.txt
By adding the greater than symbol it pipes the output to a text file.
You can name the text file whatever you want. For my purposes it was a list file for another program I was running. Each word pointed the program to a numbered dir on a computer. You could also use this to create sequential file names. For example:
This is a great little program and with a little imagination you could really put this program to great use.
word01
word02
word03
word04
The sequence of numbers had to go from 1 - 4999. Now I could of wrote this out 4999 times but that would of been painfully boring and probably would of given me a terrible case of carpal tunnel by the end of it all. Plus I use Linux, there must be an easier way to do this and there is ! It's called seq
If you open up the terminal of your choice and type man seq it pulls up a small man page with a few options you can use. The option were interested in is the -f option. This is the printf style floating-point FORMAT. If your interested in getting a better understanding of this click here. Here's a basic command using this format with output:
seq -f "%04g" 6
output:
0001
0002
0003
0004
0005
0006
The "%04g" gives us 4 digits starting with 0001 and continues on to 0006. This is pretty basic. We need to append these numbers to a word now, and start with 01 and go up to 4999. Heres what we do :
seq -f "yourword%02g" 4999
output:
yourword01
yourword02
yourword03
And this goes on till it reaches yourword4999. That would of been a lot of typing.
So now we need to put all this into a text file for another program to reference. Here's what you do.
seq -f "yourword%02g" 4999 > reference_file.txt
By adding the greater than symbol it pipes the output to a text file.
You can name the text file whatever you want. For my purposes it was a list file for another program I was running. Each word pointed the program to a numbered dir on a computer. You could also use this to create sequential file names. For example:
touch $(seq -f "yourfilename%02g.txt" 10)
This would create yourfilename01.txt to yourfilename10.txt.
This is a great little program and with a little imagination you could really put this program to great use.
Sunday, February 23, 2014
KDE Desktop Shortcuts
Heres another duh, don't I feel stupid moment. I run KDE Plasma and the last time I tried to make shortcuts on my desktop I just couldn't do it. I figured o.k. drag and drop the icon from the application launcher onto the desktop and done. That's what I tried and it just didn't work. No matter how many times I dragged the icons to the desktop they just disappeared. I figured well it's Linux so I probably have to do some weird configuration and link the icons or something.
Today I planned on spending the afternoon getting some shortcuts in order. Well guess what ? It is that simple. Drag and drop the icons onto your desktop from either application launcher, or Dolphin and your done. The only trick you need to know is this , make sure you right click on the desktop and select unlock widgets if its set to lock. Once you click unlock widgets, drag and drop the icons of the programs you want from your application launcher or Dolpin to your desktop and your done ! Easy peazy baby.
Now I've got all the programs that I use on a regular basis grouped together. For my webdesign and surfing the net I have Firefox and Chrome for social networking and checking design work, FileZilla for FTPing , and Dolphin to manage my files.
I made a second group, with Gimp, and Inkscape for my graphic design stuff, and through Gedit in the mix for coding out websites. This configuration is a real time saver for me.
Monday, February 10, 2014

Sunday, February 9, 2014
Three Ways To Get Help From The Command Line
Most people that use Linux know about and use the man pages. If you're not familiar with man pages there pretty simple to use. Open up the terminal program of your choice, at the command prompt simply type man followed by the subject you want to learn about. For example:
man finger
By typing this at the command prompt man will pull up all the information on using finger. What it does, how it works, and how to use it. To close the particular man page just press the q key and the terminal will quit man and return you to the command prompt.
There's a man page for just about everything in Linux. Want to learn more about the unzip program in my last post. Type man unzip. When your done press the q key and it will return you to the command prompt.
O.K. most people know about man pages and if you didn't, well now you know. There is also a help command that does , you guessed it... helps.If you type help help at the command prompt it will bring up some info on using help. Use help when your not sure about what a command does. For example try this.
help pwd
This will pull up a little info on the pwd command. Help isn't as in depth or massive as the man pages, but from time to time when your stuck, sometimes help can really help.
Finally we have the info command. Want to learn more about using man pages, type info man. This will bring up, you guessed it ... info on man pages. Again just hit the q key to return to the command prompt.Here's some fun things to info
info vi
info bash
You get the point. These are three easy things you can do to get help directly from the command line. This can really save your life when your in a pinch. It can make for some dry reading but you'll be surprised at what you can learn from some of these man, info, and help pages.
Saturday, February 8, 2014
Using unzip in the command line for multiple zip files
One reason for using Linux and the command line in a terminal program is the amount of time you can save doing redundant tasks. One of my resolutions for 2014 was to start using the command line more, to save time and of course learn a few tricks.
Today I tried two new things I never did with the command line. The first one was a total fail, and I'll shamefully explain what I tried to accomplish. The other thing I did was a success and saved me about a half hour of work.
The first thing I tried was downloading a bunch of zip files from a website at the same time, or with one command. There were roughly 30 zip files I needed to download, and I was planning on using wget to download all the files while I worked on other things. I have no clue what went wrong, but no matter what I tried, I just couldn't get wget to get the zip files I needed. I think it had something to do with the websites php server and some security features set on the server end. I'll be trying this again because I know it can be done, I'm fairly sure I was doing it correct, I just had to tweak something. I'll try it on an easier project in the future. So that was the fail.
Now for the success. I downloaded the 30 zip files manually, and placed them all in a temp directory. Normally I use Ark in KDE and it works great but unzipping 30 files with Ark would of taken at least 20 to 30 minutes. Instead I used "unzip" from the command line and it took about 30 seconds!!! The files I'm unzipping are jpg image files, so the filename really isn't that important, as long as I don't overwrite the duplicates and lose them.
Not knowing what I was doing I made a dir called temp-test and copied all the files to the temp-test directory I created. Then for the sake of simplicity and not making this post overly complicated and confusing for anyone newer to this like me, I used unzip -B "*.zip" and unzip did the entire job in about 30 seconds. I now had every file unzipped and ready to use.
A couple things worth mentioning. You need the quotes around the "*.zip" so that the shell won't recognize it as a wild card. Without the quotes I got
caution: filename not matched: filename.zip
I also needed to ad the -B modifier to add a ~ to the end of any duplicate filenames. This left me with 300 files with duplicate names, but I unzipped over 1000 files. So I got a little more than a third of my files in 30 seconds.
This is the command I used.
unzip -B "*.zip"
unzip is the command to unzip the file, -B is the modifier to make a backup of duplicate named files. So if you have multiple files named 03.jpg it will create a backup of 03.jpg~ 03.jpg~1 etc. etc. Finally the "*.zip" is the wild card to unzip every file with the .zip extension.
If you have no duplicate file names in your multiple zips that's great. I had some duplicate names, which left me with close to 300 backup files that I needed. I couldn't figure out how to fix this using the command line, but a quick fix using the Dolphin file manager, (I think this will work with any file manager though) was to move all the backup files into its own folder and then highlight them all, right click and select rename, this will pop up a window that will allow you to add a filename#. The hashtag will add a sequential number. So I named it dupe#.jpg which created dupe1.jpg dupe2.jpg up to 300. Luckily they were all jpg's, any name would work as long as I had the jpg extension, and this technique worked great.
I do a lot of image work so this worked perfectly for me. All in all, what took a few minutes with unzip and renaming the dupes in Dolphin would of took about 20 to 30 minutes using Ark. I'll be using this a lot for different work projects.
Thursday, January 30, 2014
Software Review Posterazor For Printing Posters
Here's a quick, easy way to print out posters from your computer. Posterazor is the perfect software solution for poster printing. If you've used The Rasterbator online, this is pretty similar but you don't have to be online to use it. Now you can print out great looking posters from home, the office or anywhere you don't have an internet connection.
So I use this personally for promo posters for my business. I have printed out a couple decorative poster art type projects, but my main use is for window posters to promote sale items. This program lets you print out an image over multiple pages of paper so you can tape or collage them together to make one large poster. Here's an example of a Valentine's Day poster I made for a friend.
I use Fedora so I did a yum search and I found it available in the repositories. yum install posterazor and yum did the rest. Using the program is pretty simple as well. Basically for my project I created a 6900 x 3600 pixel file in Gimp 2.8. Chose my font, added some clipart and exported the file as a jpg image.
Next you open Posterazor.Click on the folder icon over on the right hand side where it says input image. Find the directory where you saved the file you created and open it in The Posterazor, when the file opens click the next button over on the bottom right hand corner. You can click the images in this blog post to enlarge them for a better view.
During step 2 I kept everything on the default settings. This more or less controls your borders. You can play around with this a bit on your own. I just left it at default and cut the borders on one page so they overlapped a bit and had some room to tape. I found this easier for me. Again click next.
Step 3 lets you adjust the overlapping of the pages. Again I left this on the default setting and clicked next.
Step 4 shows you how the pages will print, and how many pages you will be using. You can adjust this to make your poster larger or smaller. I wanted mine to be about 4 pages, landscaped, to place in the storefront windor. So I created it at 2 pages width, and 1.5 page height. Click next.
Step 5 click on the floppy disk icon under where it says save the poster. Choose the directory you want to save it in, name the file and give it a pdf extension. Press the OK button and your pretty much done.
All you have to do now is open up the pdf file, click print, and your printer will do the rest. Trim the edges, I trim the edges on one side and tape it on the back. I think it looks neater and hides the tape for the most part.
Whatever you decide to use the Posterazor for, this is a great piece of software, that's fun and easy to use. Makes great posters in 6 easy steps ! This is perfect for creating promo posters for the store window at work ! If you've used this program leave a comment and tell me what you've used it for.
So I use this personally for promo posters for my business. I have printed out a couple decorative poster art type projects, but my main use is for window posters to promote sale items. This program lets you print out an image over multiple pages of paper so you can tape or collage them together to make one large poster. Here's an example of a Valentine's Day poster I made for a friend.
 |
| Valentine's Day sale poster made with some clipart, and 4 pages of paper. |
I use Fedora so I did a yum search and I found it available in the repositories. yum install posterazor and yum did the rest. Using the program is pretty simple as well. Basically for my project I created a 6900 x 3600 pixel file in Gimp 2.8. Chose my font, added some clipart and exported the file as a jpg image.
 |
| Designed in Gimp 2.8 at 6900 x 3600 pixels and exported as jpg. |
 |
| Step 1 of The Posterazor. Select the image you want to turn into a poster. |
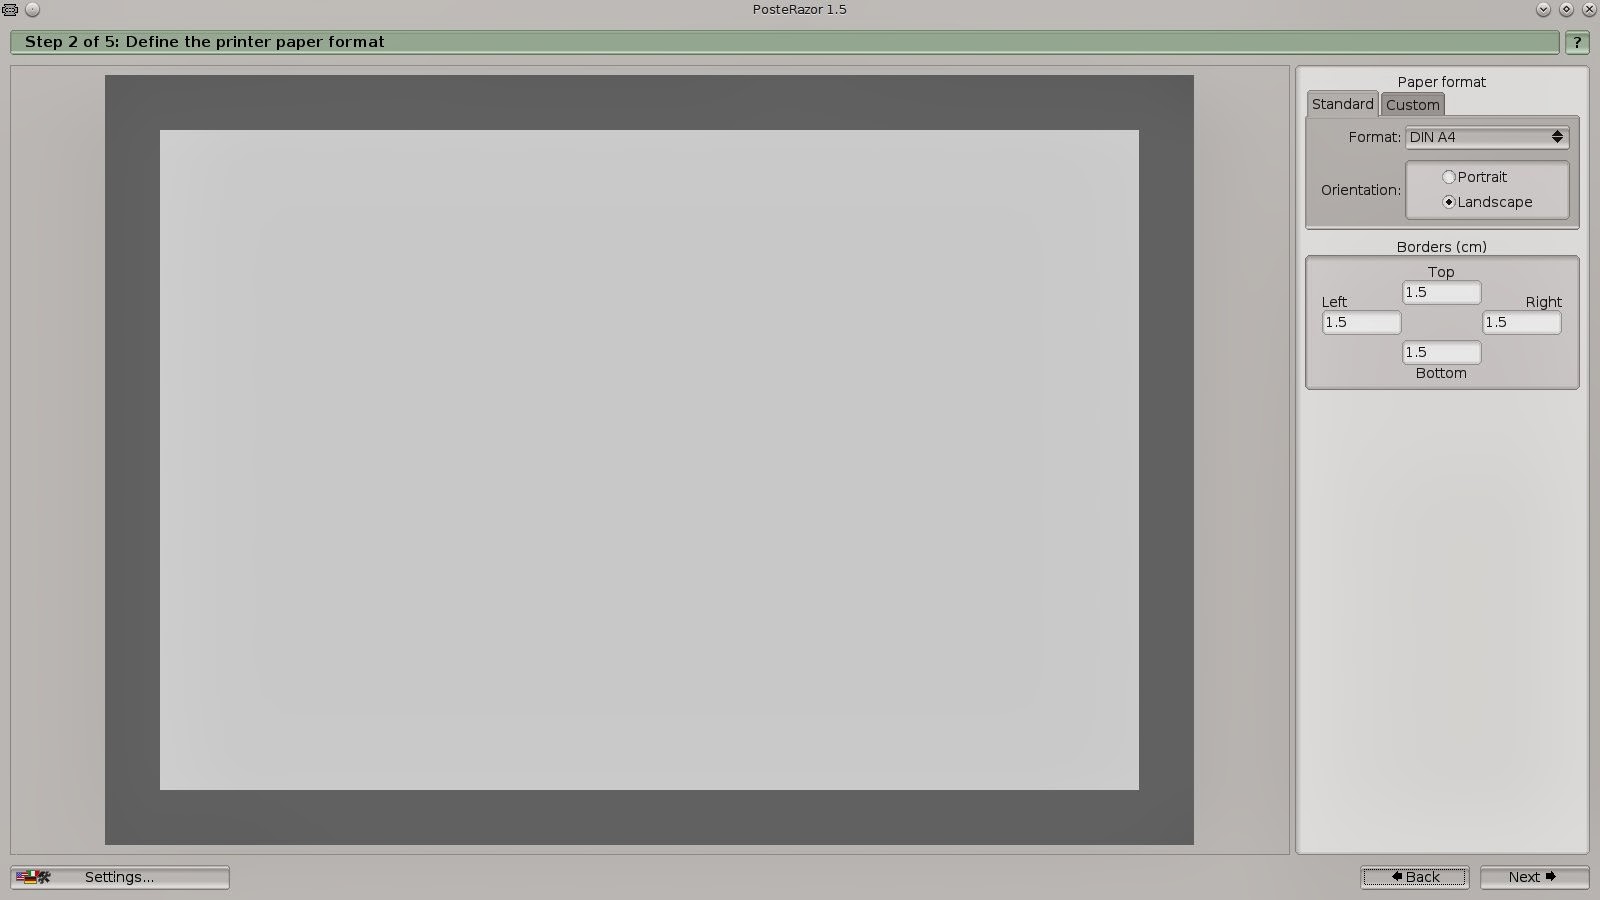 |
| In step 2 I left everything set at the defaults. |
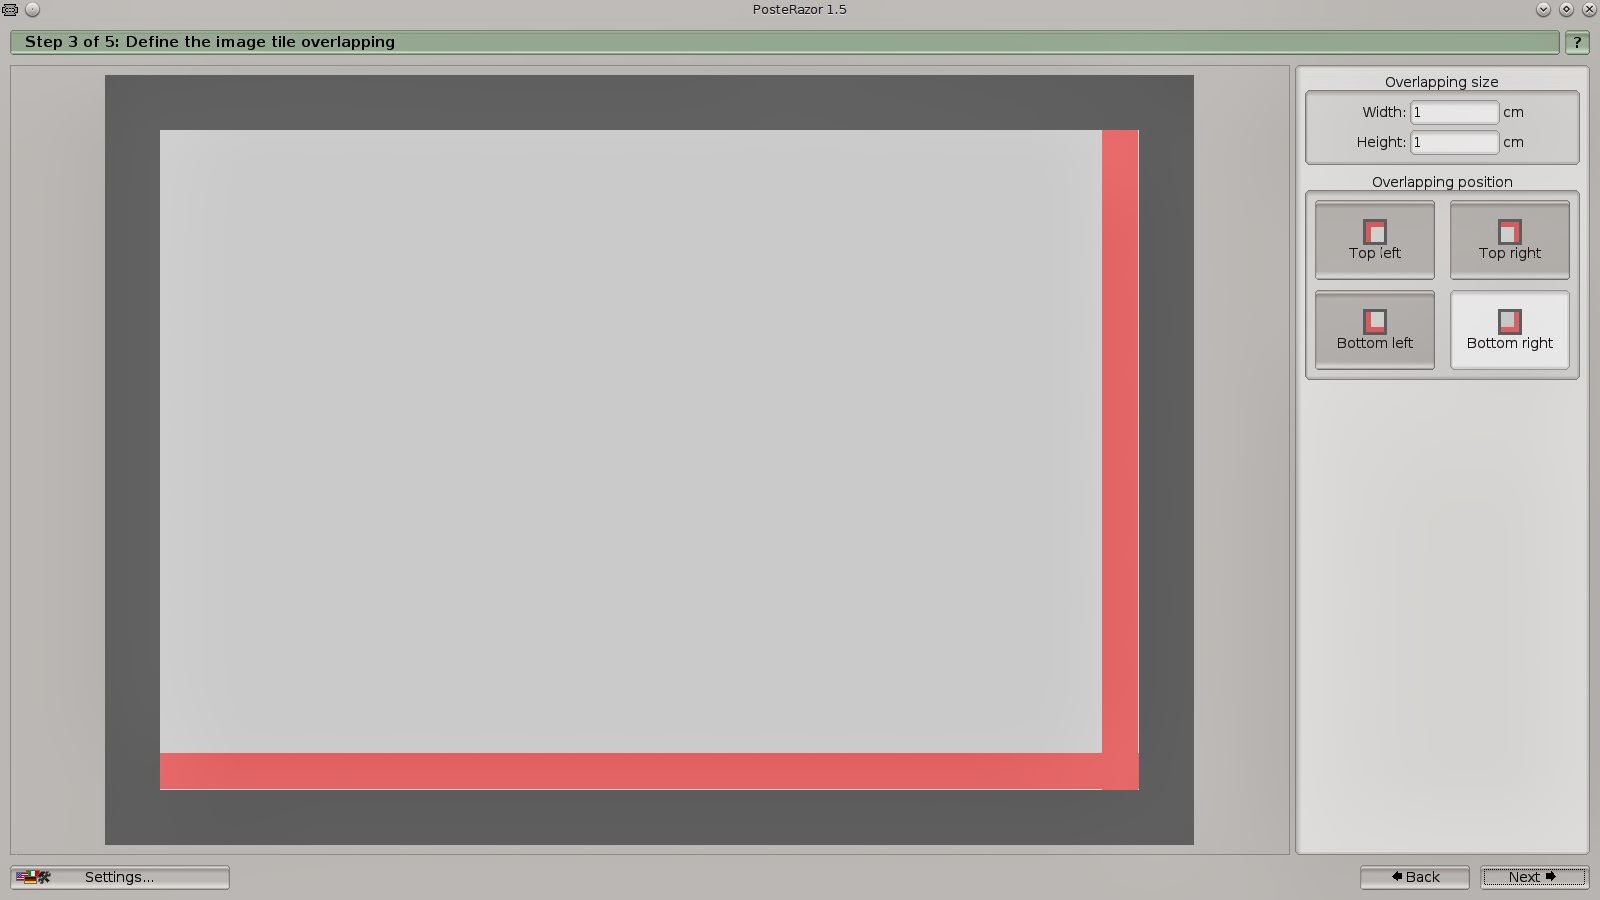 |
| Step 3 controls the overlapping, again I left this set at the defaults. |
Step 4 shows you how the pages will print, and how many pages you will be using. You can adjust this to make your poster larger or smaller. I wanted mine to be about 4 pages, landscaped, to place in the storefront windor. So I created it at 2 pages width, and 1.5 page height. Click next.
 | |
| Step 4 shows you how many pages you'll be printing. This can be adjusted to add more or less pages depending on the size of the poster desired. |
 |
| Click on the floppy disk icon, name the file and give it a pdf extension. |
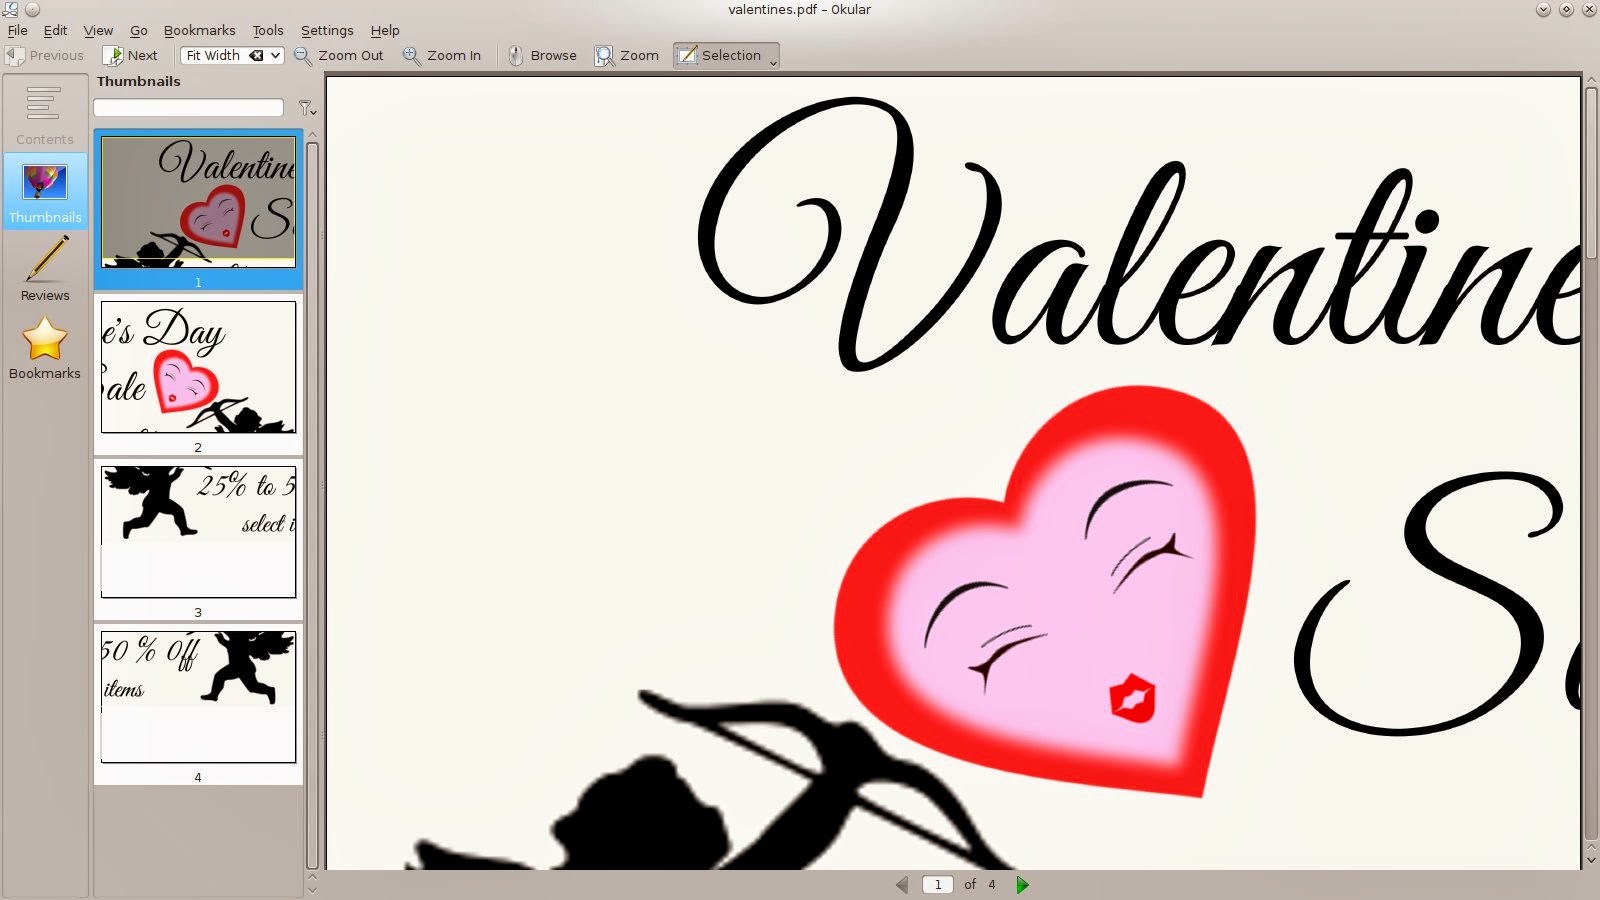 |
| Open the pdf file in your favorite pdf viewer. I used Okular. The image will be broken up in page sections. Click print, and tape your pages together, you have acheived poster ! |
Thursday, January 23, 2014
10 Months Using Linux and 2014 Update
Wow, time can really fly by ! After going through my notes it seems I've been running my Fedora machine for 10 months now as a full time Linux user. No Windows, strictly Fedora 19. I can honestly say I'm not missing Windows at all. It seems like just yesterday I deleted my Windows 7 partition, formatted the drive and installed Fedora.
Over the last 10 months I really haven't had any problems or complaints about giving up Windows. No major problems using Linux, and things seem to of gone more smoothly then I would of imagined.
One of the things that made me hesitant about becoming a full time Fedora user was that I thought I would be giving up or losing a lot when it came to software choices. It turns out that this has not been my experience at all. As a matter of fact, I've found that by switching to Linux full time I seem to have more choices for what I do and 9 out of 10 times like the Linux version better than the Windows comparable product.
For example my amateur photography work. I gave up Photoshop, and now use Gimp 2.8 , UFRaw, and Darktable. Just about everything I was using Photoshop for, I've found I can do in Gimp 2.8 and when working with RAW files Darktable has been great.
Browsing the web hasn't changed at all. I still use Firefox, Chrome, and FTP with Filezilla.
For my multimedia projects K3B took some learning but once you figure it out blows away anything that I used on Windows for burning music and data cd's.
I've come to really love LibreOffice and in my opinion find it to be just as good as MSOffice. Again, I did have to read a little and learn some of the different functions, but in the end it did exactly what I needed it to do !
For my web design projects I've been using Quanta and Gedit with much delight. Gedit is a really great text editor in my opinion perfect for coding CSS and HTML.
All and all I couldn't be happier making the switch. Everything has worked out great !
I really haven't given up a lot switching to a GNU/Linux based O.S. I've never been a big fan of gaming, so that hasn't been a problem for me. Although from what I understand , Linux gaming is also starting to come a long way. I've given up one multi player online game. I also DJ, and haven't been able to find a program to run my Hercules MP3 mixer.
Mixx is available for MP3 mixers but at the time of my research Hercules wasn't supported. I spent an afternoon trying to set a configuration for it manually with very limited results. With that said, so far that has been the only thing that I haven't been able to do with my Fedora box that I could with Windows ! Not a major loss but I do have to admit, I miss creating the occasional House and Breakbeat mix from time to time.
Over the course of 2013 I took an old VHS video collection I had and converted it to MP4 . I did this with a really cheap video capture dongle I purchased on Amazon for $9.95. It took a minute to configure, but it worked great. Then after doing some experimenting I plugged my satellite receiver into the video capture dongle and used my laptop as a TV / DVR . I was really surprised with the results considering the entire project costed me under $15.00 with parts.
Based on the results of that experiment, I'm thinking about building a cheap GNU/Linux based home entertainment P.C. for the home. I just purchased a new monitor, and I'm looking into building a P.C. box , use a Linux based O.S. and see if I can keep the entire project under a couple hundred dollars. I'll be posting the results here and update frequently.
Finally
I started the year off with a really bad case of the flu. I had big plans for 2014, and planned on starting the year off full steam ahead. That didn't happen. Today was the first day in about 3 weeks that I felt like busting out the computer and doing some serious work. I ALWAYS HAVE A COMPUTER BY ME. So I was really sick, and actually bed ridden :-(
I had a bunch of different blogs and projects that I was working on in 2013, and decided that this year I was going to trim the fat, and only work on the the projects I was really enjoying. I decided to keep this blog, my amateur photography blog, and The Design Blog@New Aeon Design. So expect a lot more posting here for 2014. I'm also planning on getting more into Command Line stuff as I find myself using the command line more and more now.
One of the other things I'm thinking about changing in 2014 is the distro. I've used Fedora for close to a year now, but I'm thinking about looking into some of the other GNU/Linux based distros available now. This blog is somewhat Fedora Centric for lack of a better word, and I would like it to become more of a general use Linux blog not really based on any particular distro. As much as I love Fedora I think it's time to test the waters with some of the other distros available. With that said "Thanks Fedora for a really pleasant user experience in 2013 !"
Thanks for following, if you made it this far, thanks for reading this long winded post. Hopefully you found it helpful. If you're considering switching over to a GNU / Linux based O.S. and found this post I hope it helps you make the right decision based on your needs. If you're not a die hard gamer, take the plunge into the world of full time Linux users , with a little time and practice I think you'll be happy with the decision you made !
Wishing you all a prosperous and productive new year. Thanks from New Aeon Design, and Notes On Using Linux !
Over the last 10 months I really haven't had any problems or complaints about giving up Windows. No major problems using Linux, and things seem to of gone more smoothly then I would of imagined.
One of the things that made me hesitant about becoming a full time Fedora user was that I thought I would be giving up or losing a lot when it came to software choices. It turns out that this has not been my experience at all. As a matter of fact, I've found that by switching to Linux full time I seem to have more choices for what I do and 9 out of 10 times like the Linux version better than the Windows comparable product.
What I'm Currently Using.
For example my amateur photography work. I gave up Photoshop, and now use Gimp 2.8 , UFRaw, and Darktable. Just about everything I was using Photoshop for, I've found I can do in Gimp 2.8 and when working with RAW files Darktable has been great.
Browsing the web hasn't changed at all. I still use Firefox, Chrome, and FTP with Filezilla.
For my multimedia projects K3B took some learning but once you figure it out blows away anything that I used on Windows for burning music and data cd's.
I've come to really love LibreOffice and in my opinion find it to be just as good as MSOffice. Again, I did have to read a little and learn some of the different functions, but in the end it did exactly what I needed it to do !
For my web design projects I've been using Quanta and Gedit with much delight. Gedit is a really great text editor in my opinion perfect for coding CSS and HTML.
All and all I couldn't be happier making the switch. Everything has worked out great !
What I've Given Up.
I really haven't given up a lot switching to a GNU/Linux based O.S. I've never been a big fan of gaming, so that hasn't been a problem for me. Although from what I understand , Linux gaming is also starting to come a long way. I've given up one multi player online game. I also DJ, and haven't been able to find a program to run my Hercules MP3 mixer.
Mixx is available for MP3 mixers but at the time of my research Hercules wasn't supported. I spent an afternoon trying to set a configuration for it manually with very limited results. With that said, so far that has been the only thing that I haven't been able to do with my Fedora box that I could with Windows ! Not a major loss but I do have to admit, I miss creating the occasional House and Breakbeat mix from time to time.
Things I've Discovered In 2013
and
Future Projects For 2014
Over the course of 2013 I took an old VHS video collection I had and converted it to MP4 . I did this with a really cheap video capture dongle I purchased on Amazon for $9.95. It took a minute to configure, but it worked great. Then after doing some experimenting I plugged my satellite receiver into the video capture dongle and used my laptop as a TV / DVR . I was really surprised with the results considering the entire project costed me under $15.00 with parts.
Based on the results of that experiment, I'm thinking about building a cheap GNU/Linux based home entertainment P.C. for the home. I just purchased a new monitor, and I'm looking into building a P.C. box , use a Linux based O.S. and see if I can keep the entire project under a couple hundred dollars. I'll be posting the results here and update frequently.
Finally
I started the year off with a really bad case of the flu. I had big plans for 2014, and planned on starting the year off full steam ahead. That didn't happen. Today was the first day in about 3 weeks that I felt like busting out the computer and doing some serious work. I ALWAYS HAVE A COMPUTER BY ME. So I was really sick, and actually bed ridden :-(
I had a bunch of different blogs and projects that I was working on in 2013, and decided that this year I was going to trim the fat, and only work on the the projects I was really enjoying. I decided to keep this blog, my amateur photography blog, and The Design Blog@New Aeon Design. So expect a lot more posting here for 2014. I'm also planning on getting more into Command Line stuff as I find myself using the command line more and more now.
One of the other things I'm thinking about changing in 2014 is the distro. I've used Fedora for close to a year now, but I'm thinking about looking into some of the other GNU/Linux based distros available now. This blog is somewhat Fedora Centric for lack of a better word, and I would like it to become more of a general use Linux blog not really based on any particular distro. As much as I love Fedora I think it's time to test the waters with some of the other distros available. With that said "Thanks Fedora for a really pleasant user experience in 2013 !"
Thanks for following, if you made it this far, thanks for reading this long winded post. Hopefully you found it helpful. If you're considering switching over to a GNU / Linux based O.S. and found this post I hope it helps you make the right decision based on your needs. If you're not a die hard gamer, take the plunge into the world of full time Linux users , with a little time and practice I think you'll be happy with the decision you made !
Wishing you all a prosperous and productive new year. Thanks from New Aeon Design, and Notes On Using Linux !
Subscribe to:
Posts (Atom)